
How to Plant a Tree in Utah Clay Soil (Without Losing It by July)

Despite it being a cool Saturday morning, you feel the hot sweat from your hours of digging. As you brush the dirt off your hands, you can’t help but enjoy the satisfaction of finally completing your task. Standing in front of you is a newly planted tree in your front yard. It’s young. It’s fragile. You love it.
As the days and weeks wear on, you continue to check up on your tree. It doesn’t seem to be doing much, but that’s okay. Then summer barges in the way it only does in Utah — all at once, and without knocking.
You watch as your tree’s leaves seem to be turning yellow. Surely the tree just needs more water to combat this heat. But the leaves start falling off. Not knowing what to do, you sadly watch through the summer as the young, vibrant tree you picked up at the nursery becomes sad and bare by September. Where did you go wrong?
Probably not in July. Probably in the first twenty minutes, before you ever filled the hole back in.
A tree that struggles all summer is usually telling you about something that happened on planting day. The good news is that every one of those mistakes is avoidable, and none of them is hard. Here's how to get a tree in the ground so it actually thrives.
When to Plant a Tree in Utah
The best time to plant is early to mid-spring, once the soil has thawed. Fall is also excellent because the roots keep growing after the leaves drop. This allows the tree to get a head start on next season.
Summer planting is possible, but it's the hard mode version. Heat and dry conditions put real stress on a tree that hasn't yet grown roots into its new home, and it will need considerably more water and attention to make it through.
How Deep and How Wide Should You Dig the Hole?
Dig the hole two to three times as wide as the root ball, and no deeper than the root ball itself.
That width matters more than people expect. Most tree roots live in the top six to eighteen inches of soil and grow outward, not down. A wide hole gives them loose soil to spread into. A deep one just gives the tree somewhere to sink.
Planting too deep is the single most common mistake we see!
A tree buried past its root collar can take years to decline, which is why so many people never connect the dying tree to the day they planted it.
Roughing up the sides of the hole helps too, especially in clay. Smooth, compact walls left by a shovel can glaze over and act like a container wall that roots struggle to break through.
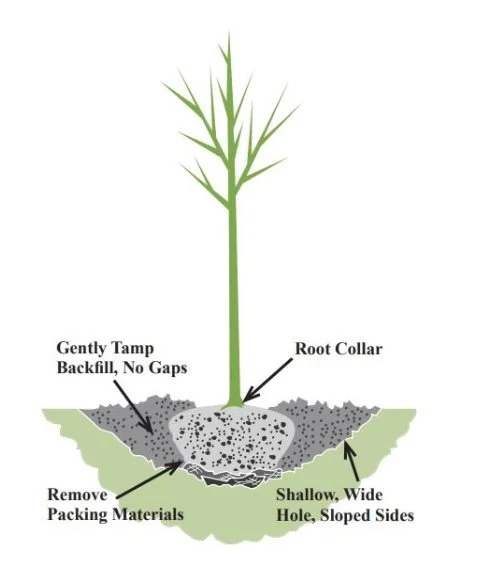
Photo from USU Extension
‘Planting Landscape Trees’
What Is a Root Collar, and Why Does It Matter?
The root collar is the point where the trunk transitions into roots. You can find it by identifying the point where the trunk begins to flare outward toward the roots. On grafted trees (fruit trees, some ornamental trees), sometimes you can see a knobby graft union.
That flare must stay visible at the soil surface. It should sit at or slightly above soil level, never below it. Bark that's meant to be above ground doesn't tolerate being buried; it stays damp, decays, and eventually the tree can't move water and nutrients up the trunk.
Sometimes growers pack the soil higher than the root collar. This causes the well-meaning gardener to plant it exactly where the soil was in the pot. Don’t be fooled! If you can’t find the root collar, gently pull the soil away from the top of the root ball until you find it, and measure your hole from there — not from the top of the potting soil.
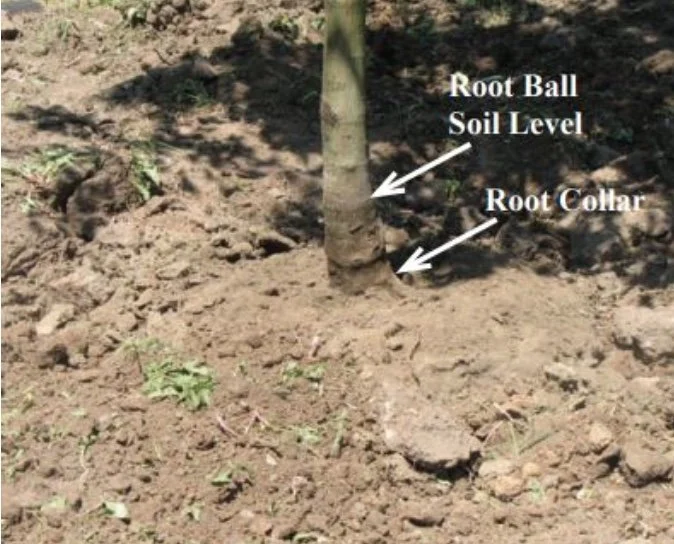
Photo from USU Extension
‘Planting Landscape Trees’
Handle your tree by the root ball- do not pull on the tree trunk to prevent damage.
Carefully set your tree in the hole- never drop your tree, or you may break roots. Again, ensure the root collar is at or above soil level.
Root Preparation
If the tree is root-bound, carefully and minimally break up the root ball. This is common for container-grown trees, due to roots circling in on themselves.
Do not bend or kink roots to make them fit. You may need to dig the hole wider or carefully cut a minimum amount of roots. Cut out any crushed, torn, or damaged roots.
Backfilling
Mix a good compost with the native soil. You want to mix at least 25% of composted organic material. Remove any large rocks in the area. In areas with high clay content, it's important to try to break it up with good compost.
Pack the soil lightly to avoid overcompaction. Keep the tree vertical and the root collar at the right level. When you are done backfilling, no roots should be visible.
Mulching
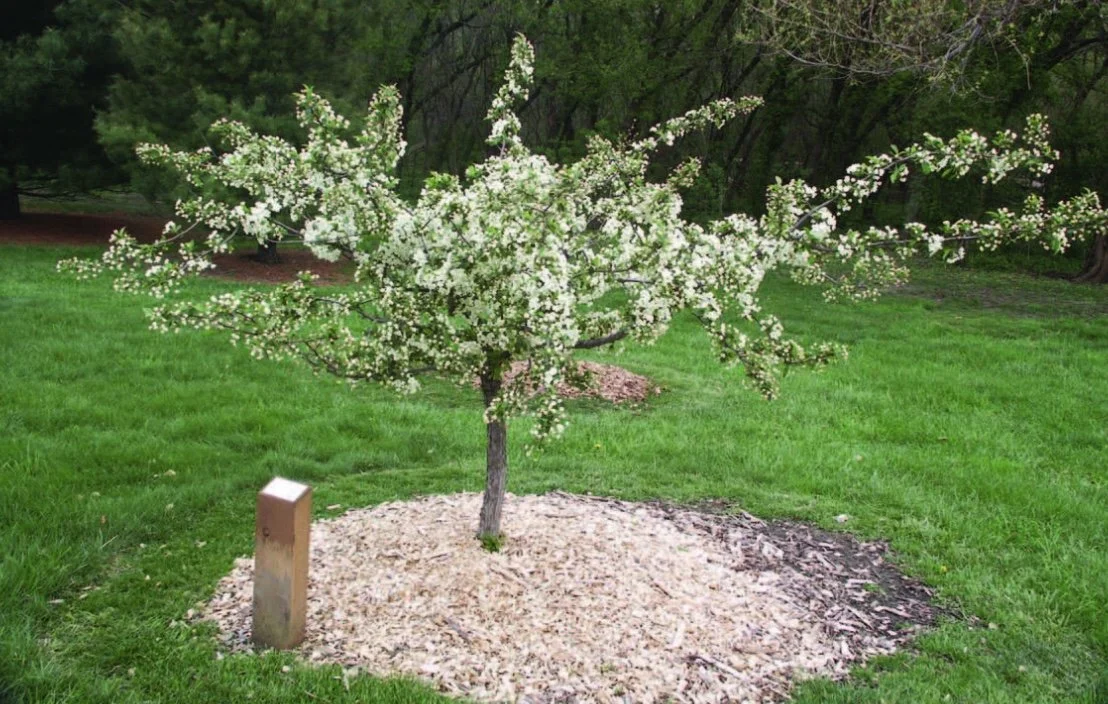
Mulching around the tree is a fantastic option to increase root growth and conserve water. Mulch should be 3-4 inches deep and maintained as it breaks down. Keep the mulch a couple of inches away from the trunk to prevent root or trunk decay.
Fertilizing
No fertilizers should be used at the time of planting. Mycorrhizae (beneficial fungi that attach to roots and promote root growth) will help develop a healthy root system or serve as root stimulators.
Fertilizing should be done after transplanting and once the tree has recovered from any shock.
Staking
Staking may be required if you are planting a tree in a windy area or corner. Only stake newly planted trees and remove stakes after 1-2 years. Staking should be loose, and any wire or cords must be padded to avoid damaging the tree trunk.
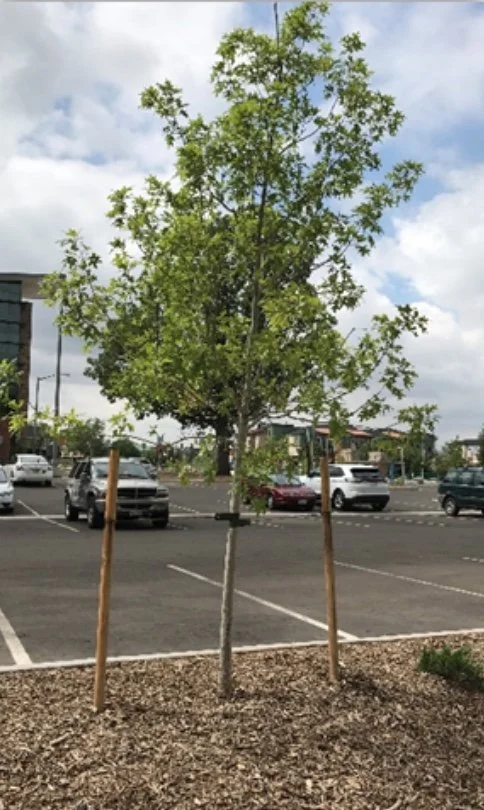
Photo from USU Extension
‘Staking Trees- Alison O’Connor’